
Manage the chart of accounts
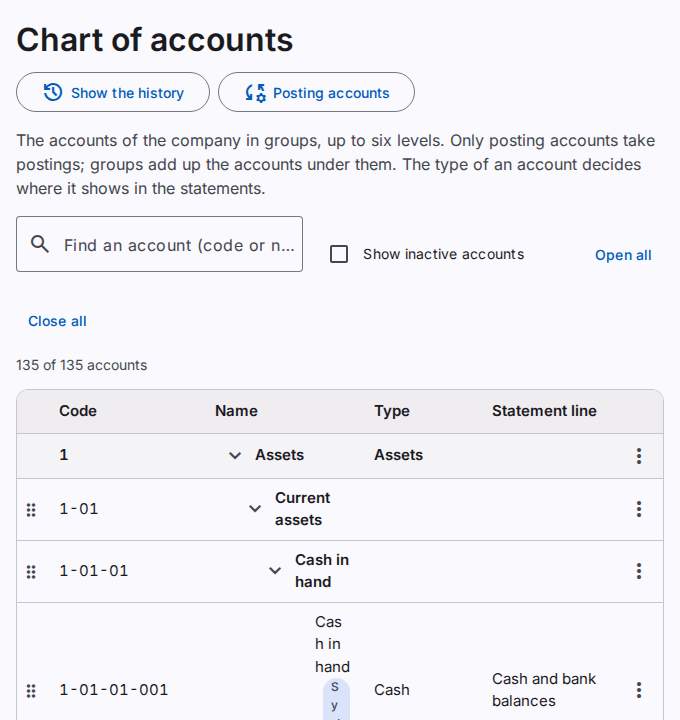
The Chart of accounts page shows the accounts of the working company. Each company has its own chart. You must have the View the chart of accounts permission to see the page.
How the chart is made
The chart is a tree with up to six levels. Level 1 has the five classes: Assets, Liabilities, Equity, Income and Expenses. The system makes these five accounts.
Each account below a class is one of two kinds:
- A group adds up the accounts under it and takes no postings, for example Current assets (code
1-01). - A posting account takes postings and has no accounts under it, for example Petty cash (code
1-01-01-002).
A posting account can be at any level from 2 to 6. A group can be at any level. The standard chart uses four levels, with the posting accounts at level 4.
Each posting account has an Account type and a Statement line. The account type decides the statements and the checks of the postings, not the code. The statement line is the line of the balance sheet or the income statement that shows the account.
An account with the label System is a posting account. Refer to Choose the posting accounts.
Set up the chart of a company
A new company gets its chart when you create it. Refer to Manage the companies. A company without a chart shows the box Set up the chart of accounts. You must have the Add accounts permission.
- Select one of the two options:
- The standard chart for a trading business. Then select the Language of the account names.
- A copy of the chart of another company. Then select the Company to copy from.
- Select Set up the chart.
The page shows the new chart. A copy takes the accounts, the statement lines and the posting accounts. It takes no balances.
Find an account
- Type a part of the code or the name in Find an account.
The list shows the accounts that agree with the text, and their groups. To open or close a group, select the arrow before its name. To show all groups, select Open all.
Add an account or a group
You must have the Add accounts permission.
- In the row of the group, select the Actions button (three dots).
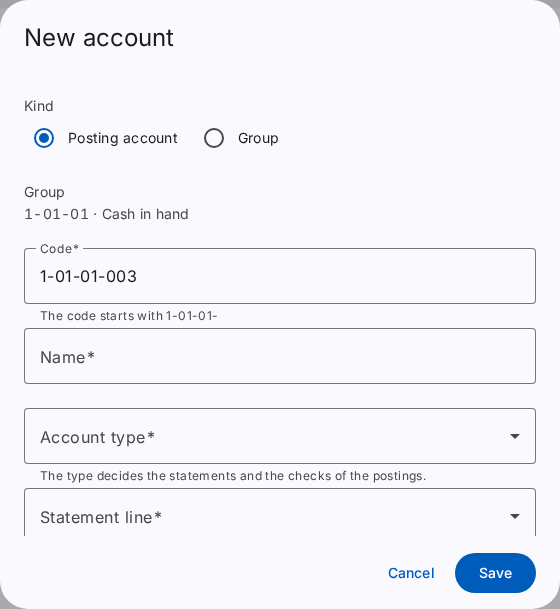
- Select Add an account or Add a group. You can make the choice again in the dialog, under Kind.
- Make sure that the Code is correct. The system suggests the next free code. The code must start with the code of the group.
- Type the Name.
- For a posting account: select the Account type and the Statement line.
- Select Save.
The page shows "The account is saved."
Change an account
You must have the Change accounts permission.
- In the row of the account, select the Actions button.
- Select Edit.
- Change the fields.
- Select Save.
You can move an account or a group to another group of the same class, also when it has postings. Select the new Group. The system suggests the next free code in the new group. A group moves with all the accounts under it, and their codes change to start with the new code of the group. When you change the code of a group, the codes under it change in the same way. The chart has six levels at most, so some groups are not in the list.
To move an account to another class, for example from Assets to Expenses, add a new account in that class. Then move the balance with a journal.
You can change the Kind of an account. A posting account becomes a group only when it has no postings. A group becomes a posting account only when it has no accounts under it.
For a system account, you can change only the name. The type stays the same, and you cannot deactivate the account.
Change the order or the group by drag and drop
You must have the Change accounts permission. Use a computer with a mouse. On a phone and with the keyboard, use Move up, Move down and Edit in the Actions menu.
- Point to the handle (six dots) at the start of the row.
- Drag the row:
- to a line between two accounts of the same group: the account gets this place in the group;
- onto the middle of another group: the account moves into this group.
- If the account goes to another group, a dialog shows the New group and the New code. Make sure that the code is correct. Select Move.
The codes stay the same when you change the order in a group. The order applies to the chart, the trial balance and the statements. The search shows a part of the chart only, so you cannot drag while the search has text.
Deactivate an account
You must have the Deactivate accounts permission. You can deactivate only an account with a zero balance. You cannot delete an account.
- In the row of the account, select the Actions button.
- Select Deactivate.
The account does not show in the list. To see it, select Show inactive accounts. To use it again, select Activate again. A group with active accounts under it cannot be deactivated.
The history of the chart
Select Show the history to see the changes to the accounts. Refer to See the business history.